Documentation Index
Fetch the complete documentation index at: https://docs.picaos.com/llms.txt
Use this file to discover all available pages before exploring further.

Open AuthKit Management
Manage your integrations in the AuthKit dashboard
Once AuthKit is set up, you’ll need to manage your users’ connections, configure which integrations are available, and make authenticated requests to access their data. This guide covers everything you need to know.
Understanding connection ownership
Every connection created through AuthKit belongs to an identity—the unique identifier you provided when generating the AuthKit token (likeuserId, teamId, or organizationId).
This identity-based ownership enables:
- Multi-tenant architecture: Each user, team, or organization has isolated connections
- Filtered queries: List connections for specific users or teams
- Access control: Users can only access connections they own
- Data isolation: No cross-contamination between users’ integration data
How identity scoping works
When you create an AuthKit token:identity: "user_123". This means:
- You can list all connections for
user_123 - You can filter connections by this identity
- Requests made with these connection keys automatically scope to this user’s data
Managing connections
List connections for a user
To display a user’s connected integrations, use the List Connections API and filter by identity:cURL
Delete a user’s connection
Allow users to disconnect an integration using the Delete Connection API:Add tags to a user’s connection
Update a connection’s tags using the Update Connection API:Making authenticated requests
Once a user has connected an integration through AuthKit, you can make API requests on their behalf using the connection key.Using the Passthrough API
The Passthrough API lets you make authenticated HTTP requests to any integration endpoint:x-pica-connection-key: The connection key from the user’s connected integrationx-pica-action-id: The specific action you want to perform (found in the Available Actions API or in the Actions table in the Pica dashboard)- The request is automatically authenticated using the stored credentials for that connection
Learn more about the Passthrough API
See the full documentation for advanced usage and best practices.
Choosing the right connection key
When a user has multiple connections, you need to:- List their connections to see what’s available
- Filter by platform to find the specific integration you need
- Use the connection key when making requests
Using ToolKit for Agents
For allowing agents to make requests, load Pica’s ToolKit into your agent.Example using the Vercel AI SDK
Configuring integrations
Toggle integration visibility
By default, integrations are not visible in AuthKit. You must explicitly enable the integrations you want your users to see.
- Navigate to the AuthKit settings page
- Browse the list of integrations
- Toggle integrations on or off based on what your application needs
- Changes take effect immediately in your AuthKit modal
Set up OAuth applications
For OAuth-based integrations (Google, Microsoft, Salesforce, etc.), you can use your own OAuth credentials: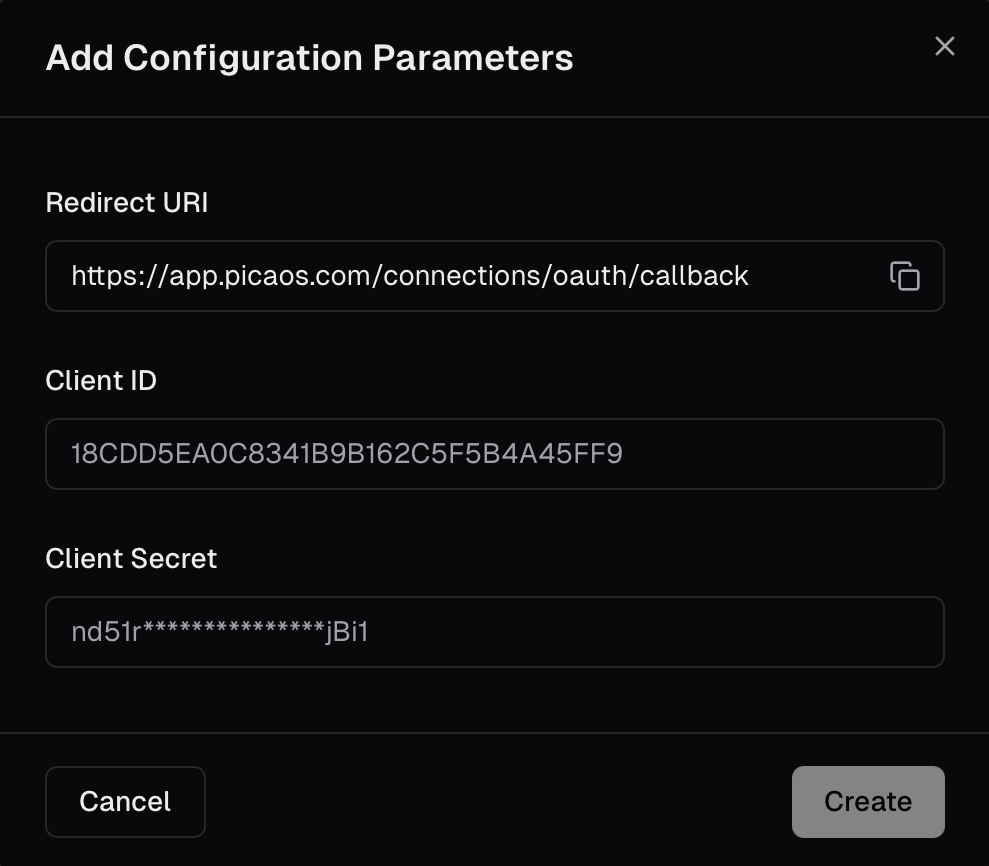
- Go to the AuthKit settings page
- Select an OAuth integration (e.g., Gmail, Slack)
- Click “Configure OAuth App”
- Enter your Client ID and Client Secret from the integration’s developer console
- Set the Redirect URI in your OAuth app to:
https://api.picaos.com/connections/oauth/callback

- Branding: Users see your app name during OAuth consent
- Rate limits: Higher API rate limits for your application
- Compliance: Meet enterprise security requirements
- Control: Full ownership of the OAuth relationship
Security best practices
Never expose your API key in frontend code
Never expose your API key in frontend code
Your Pica API key should only be used on your backend. Always generate AuthKit tokens server-side and send them to your frontend. Never include your API key in client-side JavaScript.
Validate user identity before generating tokens
Validate user identity before generating tokens
Before generating an AuthKit token, verify that the requesting user is authenticated in your application. Don’t let unauthenticated users generate tokens.
Use HTTPS in production
Use HTTPS in production
Always serve your application over HTTPS in production to protect tokens and connection keys in transit.
Store connection keys securely
Store connection keys securely
If you store connection keys in your database, ensure your database is properly secured.
Implement proper access control
Implement proper access control
When a user requests data from an integration, verify they own the connection before making the API request:
Troubleshooting
AuthKit modal not opening
AuthKit modal not opening
Possible causes:
- Token endpoint is failing or returning an error
- CORS issues blocking the token request
- Invalid API key
- Check browser console for errors
- Verify your token endpoint is accessible and returns a valid token
- Ensure CORS headers are set correctly on your backend
- Confirm your API key is valid in the Pica dashboard
OAuth flow failing
OAuth flow failing
Possible causes:
- Incorrect OAuth credentials
- Redirect URI mismatch
- Missing OAuth scopes/permissions
- Verify Client ID and Client Secret are correct in AuthKit settings
- Ensure redirect URI is exactly:
https://api.picaos.com/oauth/callback - Check that required scopes are enabled in your OAuth app
Connection not found
Connection not found
Possible causes:
- Wrong identity or identityType
- Connection was deleted
- Querying with wrong connection key
- List connections for the identity to see what exists
- Verify the identity matches what was used when creating the token
- Check that the connection wasn’t deleted
API requests failing with 401
API requests failing with 401
Possible causes:
- Invalid connection key
- Token expired or revoked by user
- Wrong API key
- Verify connection key is correct
- Check connection status with the Get Connection API
- Have the user reconnect if their token was revoked
Need help?
Contact our support team at support@picaos.com for assistance
What’s next?
Passthrough API
Learn how to make authenticated requests to integration APIs
Available Actions
Browse all available integration actions and their parameters
Vault API
Explore the full Vault API for managing connections
ToolKit SDK
Simplify integration requests with the OneTool SDK